Running the ILAMB on Gadi
Overview
Teaching: 30 min
Exercises: 60 min
Compatibility: ILAMB v2.7.1Questions
How do I run the ILAMB on NCI GADI?
Objectives
Understand how to load, configure and run the ILAMB using the ACCESS-NRI ILAMB-Workflow
What is the ILAMB?
The International Land Model Benchmarking (ILAMB) project is a model-data intercomparison and integration project designed to improve the performance of land models and, in parallel, improve the design of new measurement campaigns to reduce uncertainties associated with key land surface processes.
The purpose of the Quickstart Guide is to provide users of GADI with a streamlined process to rapidly run the International Land Model Benchmarking (ILAMB) system. ACCESS-NRI offers an already configured ILAMB module via the ILAMB-Workflow, enabling users to quickly initiate benchmarking tasks without the need for deployment. This guide is designed to help users efficiently begin evaluating land model outputs against observational datasets with minimal setup time.
How to cite the ILAMB?
Collier, N., Hoffman, F. M., Lawrence, D. M., Keppel-Aleks, G., Koven, C. D., Riley, W. J., et al. (2018). The International Land Model Benchmarking (ILAMB) system: Design, theory, and implementation. Journal of Advances in Modeling Earth Systems, 10, 2731–2754. https://doi.org/10.1029/2018MS001354
The ILAMB on NCI-Gadi
For NCI users, ACCESS-NRI is providing a conda environment with the latest version of ILAMB through project xp65..
module use /g/data/xp65/public/modules
module load ilamb-workflow
or
module use /g/data/xp65/public/modules
module load conda/access-med
To run the ILAMB, you need to execute the command ilamb-run with a number of arguments/files:
ilamb-run --config config.cfg --model_setup model_setup.txt --regions global
config.cfgdefines which observables and observational datasets will be comparedmodel_setup.txtdefines the paths of the models that will be compared
Below we explain how to setup the necessary directory structures and the example files mentioned above. For detailed information on the arguments of
ilamb-run, please consult the official ILAMB documentation.
Organising Data and Model Outputs for ILAMB Benchmarking
ILAMB requires files to be organized within a specific directory structure, consisting of DATA and MODELS directories. The DATA directory contains observational datasets, while the MODELS directory holds the output from the models you wish to benchmark. Adhering to this structure is essential for ILAMB to correctly locate and compare the datasets during the benchmarking process.
The following directory tree represents a typical ILAMB_ROOT setup for CMIP comparison on NCI/Gadi:
$ILAMB_ROOT/
|-- DATA -> /g/data/ct11/access-nri/replicas/ILAMB
|-- MODELS
  |-- ACCESS-ESM1-5
  |   `-- piControl
  |       `-- r3i1p1f1
                 ├── evspsbl.nc
                 ├── hfds.nc
                 ├── hfls.nc
                 ├── hfss.nc
                 ├── hurs.nc
                 ├── pr.nc
                 ├── rlds.nc
                 ├── rlus.nc
                 ├── rsds.nc
                 ├── rsus.nc
                 ├── tasmax.nc
                 ├── tasmin.nc
                 ├── tas.nc
                 └── tsl.nc
The top level of this directory structure is defined by the ILAMB_ROOT path, which should be set as an environment variable:
export ILAMB_ROOT=/path/to/your/ILAMB_ROOT/directory
By exporting this path as $ILAMB_ROOT, you ensure that the ILAMB can correctly locate the necessary directories and files during the benchmarking process.”
- the
DATAdirectory: this is where we keep the observational datasets each in a subdirectory bearing the name of the variable. - the
MODELdirectory: this directory can be populated with symbolic links to the model outputs.
Automating ILAMB Directory Structure Setup with ilamb-tree-generator
To simplify the setup of an ILAMB-ROOT directory tree, ACCESS-NRI offers a tool called ilamb-tree-generator, available within the ILAMB-Workflow through the access-med environment of the xp65 project.
The ilamb-tree-generator automates the creation of the necessary ILAMB directory structure. It efficiently generates symlinks to the ACCESS-NRI Replicated Datasets for Climate Model Evaluation and to the relevant sections of the model outputs. This automation helps ensure that your ILAMB benchmarking setup is correctly configured with minimal manual intervention.
To add model outputs, you can list them in a YAML file, formatted as follows:
datasets:
   - {mip: CMIP, institute: CSIRO-ARCCSS, dataset: ACCESS-CM2, project: CMIP6, exp: piControl, ensemble: r3i1p1f1}
   - {mip: CMIP, institute: CSIRO-ARCCSS, dataset: ACCESS-CM2, project: CMIP6, exp: piControl, ensemble: r3i1p2f1}
   - {mip: CMIP, institute: CSIRO-ARCCSS, dataset: ACCESS-CM2, project: CMIP6, exp: piControl, ensemble: r3i1p3f1}
Once your YAML file is ready, you can run the tool from the command line to generate the directory structure:
ilamb-tree-generator --datasets models.yml --ilamb_root $ILAMB_ROOT
This command will automatically create the appropriate folders under the specified ILAMB_ROOT path, ensuring that your data is organized correctly for ILAMB benchmarking.”
Exercise
Copy the above to a models.yml file and try to run the
ilamb-tree-generator
ILAMB model selection: model_setup.txt
In the model_setup.txt, you can select all the model outputs that you want to compare.
Assuming you want to compare the three models that we used in ILAMB_ROOT/MODELS, you would need to create a model_setup.txt file wehere you define both the model labels and their paths:
 # Model Name (used as label), ABSOLUTE/PATH/TO/MODELS or relative to $ILAMB_ROOT/ , Time Shift
   piControl_r3i1p1f1, /scratch/nf33/yz9299/ILAMB-sep-2024/ILAMB_ROOT/MODELS/ACCESS-CM2/piControl/r3i1p1f1/, 1000, 1920
   piControl_r3i1p2f1, /scratch/nf33/yz9299/ILAMB-sep-2024/ILAMB_ROOT/MODELS/ACCESS-CM2/piControl/r3i1p2f1/, 1000, 1920
   piControl_r3i1p3f1, /scratch/nf33/yz9299/ILAMB-sep-2024/ILAMB_ROOT/MODELS/ACCESS-CM2/piControl/r3i1p3f1/, 1000, 1920
Since ILAMB require model-output data and observational data should have time overlap. In this case, our piControl data time-range is (1000-1080)
, and most of the observational data time range is (1900-2000), so we specify time shift in model_setup.txt from 1000 to 1920, make it comparable with observational data.
Configuring and Running a Benchmark Study with the ILAMB
ILAMB uses a config.cfg file as its configuration file to initiate a benchmark study. This file allows you to set up comparison sections and specify which variables from which datasets will be compared.
An example configuration file for ILAMB on Gadi might be named config.cfg. It could be used to compare your models with two variables from the radiation and energy cycle, as measured by the Clouds and the Earth’s Radiant Energy System (CERES) project:
This configuration file is used to define the comparison sections, variables, and observational datasets required for running ILAMB on Gadi. The file is organised with the following structure:
[h1:] Sections
[h2:] Variables
[]    Observational Datasets
- Sections: Define the major comparison categories or groups within the benchmark study.
- Variables: Specify the particular variables that will be compared between model outputs and observational data.
- Observational Datasets: List the datasets used for comparison, detailing where ILAMB will source the observational data.
For further guidance on how to create and use configuration files, refer to the ILAMB Tutorial on Configure Files. You can also consult the ILAMB and IOMB dataset collections at ILAMB Datasets.
A minimal Example
[h1: Hydrology Cycle]
bgcolor = "#E6F9FF"

[h2: Evapotranspiration]
variable       = "et"
alternate_vars = "evspsbl"
cmap           = "Blues"
weight         = 5
mass_weighting = True

[MODIS]
source        = "DATA/evspsbl/MODIS/et_0.5x0.5.nc"
weight        = 15
table_unit    = "mm d-1"
plot_unit     = "mm d-1"
relationships = "Precipitation/GPCPv2.3","SurfaceAirTemperature/CRU4.02"
this example configuration file is set up for running ILAMB on Gadi and specifies details for comparing data related to the hydrology cycle. Here’s a breakdown of what each section does:
 [h1: Hydrology Cycle]
 bgcolor = "#E6F9FF"
- [h1: Hydrology Cycle]: This section defines a major comparison category called “Hydrology Cycle” and sets a background color for visualizations.
 [h2: Evapotranspiration]
 variable       = "et"
 alternate_vars = "evspsbl"
 cmap           = "Blues"
 weight         = 5
 mass_weighting = True
- [h2: Evapotranspiration]: This subsection focuses on “Evapotranspiration” within the hydrology cycle.
variable: Specifies the main variable to compare, which is “et” (evapotranspiration).alternate_vars: Provides an alternate variable name “evspsbl” that might be used in the data.cmap: Sets the color map for plotting the data, here using shades of blue.weight: Assigns a weight of 5 to this variable in the comparisons.mass_weighting: Indicates that mass weighting should be applied (True).
 [MODIS]
 source        = "DATA/evspsbl/MODIS/et_0.5x0.5.nc"
 weight        = 15
 table_unit    = "mm d-1"
 plot_unit     = "mm d-1"
 relationships = "Precipitation/GPCPv2.3","SurfaceAirTemperature/CRU4.02"
- [MODIS]: This section specifies details for the observational dataset related to MODIS.
source: Points to the file location of the MODIS dataset.weight: Assigns a weight of 15 to this dataset in the comparisons.table_unit: Defines the unit of measurement for the dataset, “mm d-1” (millimeters per day).plot_unit: Specifies the unit of measurement for plotting, also “mm d-1”.relationships: Lists other related datasets, such as precipitation and surface air temperature, indicating how they relate to the MODIS dataset.
Exercise: Adding a Second Observational Dataset to the ILAMB Configuration File
In this exercise, you will add a second observational dataset to your ILAMB configuration file. Follow these steps to integrate a new dataset,
[MOD16A2], into your existing configuration:
Open Your ILAMB Configuration File: Locate and open the ILAMB configuration file you are currently using.
- Identify the Section for Observational Datasets:
- Scroll to the section of the file where observational datasets are listed.
- Add the New Dataset:
- Insert the following block of code to include the
[MOD16A2]observational dataset:[MOD16A2] source = "DATA/evspsbl/MOD16A2/et.nc" weight = 15 table_unit = "mm d-1" plot_unit = "mm d-1" relationships = "Precipitation/GPCPv2.3","SurfaceAirTemperature/CRU4.02"
- This entry specifies the details for the new dataset:
source: Path to the dataset file.weight: Weight assigned to this dataset for comparisons.table_unit: Unit of measurement used in tables.plot_unit: Unit of measurement used in plots.relationships: Lists other related datasets for comparison.- Save Your Changes: Make sure to save the configuration file after adding the new dataset.
Solution
# This configure file specifies comparison sections, variables and observational data for running ILAMB on Gadi.

# See https://www.ilamb.org/doc/first_steps.html#configure-files for the ILAMB Tutorial that addesses Configure Files
# See https://www.ilamb.org/datasets.html for the ILAMB and IOMB collections

# Structure:
# [h1:] Sections
# [h2:] Variables
# []    Observational Datasets

#=======================================================================================

[h1: Hydrology Cycle]
bgcolor = "#E6F9FF"

[h2: Evapotranspiration]
variable       = "et"
alternate_vars = "evspsbl"
cmap           = "Blues"
weight         = 5
mass_weighting = True

[MODIS]
source        = "DATA/evspsbl/MODIS/et_0.5x0.5.nc"
weight        = 15
table_unit    = "mm d-1"
plot_unit     = "mm d-1"
relationships = "Precipitation/GPCPv2.3","SurfaceAirTemperature/CRU4.02"

[MOD16A2]
source        = "DATA/evspsbl/MOD16A2/et.nc"
weight        = 15
table_unit    = "mm d-1"
plot_unit     = "mm d-1"
relationships = "Precipitation/GPCPv2.3","SurfaceAirTemperature/CRU4.02"


#~~~~~~~~~~~~~~~~~~~~~~~~~~~~~~~~~~~~~~~~~~~~~~~~~~~~~~~~~~~~~~~~~~~~~~~~~~
Exercise: Adding New Comparison Details to the ILAMB Configuration File
In this exercise, you will add a new section for “Latent Heat” to the ILAMB configuration file. Follow the steps below:
Open your existing ILAMB configuration file: Locate and open the configuration file you have been working with.
- Add a new subsection for Latent Heat:
- Scroll to the appropriate location in the file where you want to add the new details.
- Insert the following content to define the “Latent Heat” comparison:
 [h2: Latent Heat]
 variable       = "hfls"
 alternate_vars = "le"
 cmap           = "Oranges"
 weight         = 5
 mass_weighting = True
- This section sets up a comparison for “Latent Heat,” specifying the variable, alternate names, color map, weight, and mass weighting.
- Add details for the FLUXCOM dataset:
- Below the “Latent Heat” subsection, add the following content to define the FLUXCOM dataset:
 [FLUXCOM]
 source   = "DATA/hfls/FLUXCOM/le.nc"
 land     = True
 weight   = 9
 skip_iav = True
- This section specifies the source file for the FLUXCOM dataset, assigns a weight, indicates whether land data is included, and whether to skip inter-annual variability.
- Save your changes: Ensure that the file is saved with the new sections included.
Solution
# This configure file specifies comparison sections, variables and observational data for running ILAMB on Gadi.

# See https://www.ilamb.org/doc/first_steps.html#configure-files for the ILAMB Tutorial that addesses Configure Files
# See https://www.ilamb.org/datasets.html for the ILAMB and IOMB collections

# Structure:
# [h1:] Sections
# [h2:] Variables
# []    Observational Datasets

#=======================================================================================

[h1: Hydrology Cycle]
bgcolor = "#E6F9FF"

[h2: Evapotranspiration]
variable       = "et"
alternate_vars = "evspsbl"
cmap           = "Blues"
weight         = 5
mass_weighting = True

[MODIS]
source        = "DATA/evspsbl/MODIS/et_0.5x0.5.nc"
weight        = 15
table_unit    = "mm d-1"
plot_unit     = "mm d-1"
relationships = "Precipitation/GPCPv2.3","SurfaceAirTemperature/CRU4.02"

[MOD16A2]
source        = "DATA/evspsbl/MOD16A2/et.nc"
weight        = 15
table_unit    = "mm d-1"
plot_unit     = "mm d-1"
relationships = "Precipitation/GPCPv2.3","SurfaceAirTemperature/CRU4.02"


#~~~~~~~~~~~~~~~~~~~~~~~~~~~~~~~~~~~~~~~~~~~~~~~~~~~~~~~~~~~~~~~~~~~~~~~~~~

[h2: Latent Heat]
variable       = "hfls"
alternate_vars = "le"
cmap           = "Oranges"
weight         = 5
mass_weighting = True

[FLUXCOM]
source   = "DATA/hfls/FLUXCOM/le.nc"
land     = True
weight   = 9
skip_iav = True

#~~~~~~~~~~~~~~~~~~~~~~~~~~~~~~~~~~~~~~~~~~~~~~~~~~~~~~~~~~~~~~~~~~~~~~~~~~
A Comprehensive example
# This configure file specifies comparison sections, variables and observational data for running ILAMB on Gadi.

# See https://www.ilamb.org/doc/first_steps.html#configure-files for the ILAMB Tutorial that addesses Configure Files
# See https://www.ilamb.org/datasets.html for the ILAMB and IOMB collections

# Structure:
# [h1:] Sections
# [h2:] Variables
# []    Observational Datasets

#=======================================================================================

[h1: Hydrology Cycle]
bgcolor = "#E6F9FF"

[h2: Evapotranspiration]
variable       = "et"
alternate_vars = "evspsbl"
cmap           = "Blues"
weight         = 5
mass_weighting = True

[MODIS]
source        = "DATA/evspsbl/MODIS/et_0.5x0.5.nc"
weight        = 15
table_unit    = "mm d-1"
plot_unit     = "mm d-1"
relationships = "Precipitation/GPCPv2.3","SurfaceAirTemperature/CRU4.02"

[MOD16A2]
source        = "DATA/evspsbl/MOD16A2/et.nc"
weight        = 15
table_unit    = "mm d-1"
plot_unit     = "mm d-1"
relationships = "Precipitation/GPCPv2.3","SurfaceAirTemperature/CRU4.02"


#~~~~~~~~~~~~~~~~~~~~~~~~~~~~~~~~~~~~~~~~~~~~~~~~~~~~~~~~~~~~~~~~~~~~~~~~~~

[h2: Latent Heat]
variable       = "hfls"
alternate_vars = "le"
cmap           = "Oranges"
weight         = 5
mass_weighting = True

[FLUXCOM]
source   = "DATA/hfls/FLUXCOM/le.nc"
land     = True
weight   = 9
skip_iav = True

[DOLCE]
source   = "DATA/evspsbl/DOLCE/DOLCE.nc"
weight   = 15
land     = True

#~~~~~~~~~~~~~~~~~~~~~~~~~~~~~~~~~~~~~~~~~~~~~~~~~~~~~~~~~~~~~~~~~~~~~~~~~~

[h2: Sensible Heat]
variable       = "hfss"
alternate_vars = "sh"
weight         = 2
mass_weighting = True

[FLUXCOM]
source   = "DATA/hfss/FLUXCOM/sh.nc"
weight   = 15
skip_iav = True

###########################################################################

[h1: Radiation and Energy Cycle]
bgcolor = "#FFECE6"

#~~~~~~~~~~~~~~~~~~~~~~~~~~~~~~~~~~~~~~~~~~~~~~~~~~~~~~~~~~~~~~~~~~~~~~~~~~

[h2: Albedo]
variable = "albedo"
weight   = 1
ctype    = "ConfAlbedo"

[CERESed4.1]
source   = "DATA/albedo/CERESed4.1/albedo.nc"
weight   = 20

[GEWEX.SRB]
source   = "DATA/albedo/GEWEX.SRB/albedo_0.5x0.5.nc"
weight   = 20

#~~~~~~~~~~~~~~~~~~~~~~~~~~~~~~~~~~~~~~~~~~~~~~~~~~~~~~~~~~~~~~~~~~~~~~~~~~

[h2: Surface Upward SW Radiation]
variable = "rsus"
weight   = 1

[FLUXNET2015]
source   = "DATA/rsus/FLUXNET2015/rsus.nc"
weight   = 12

[GEWEX.SRB]
source   = "DATA/rsus/GEWEX.SRB/rsus_0.5x0.5.nc"
weight   = 15

[WRMC.BSRN]
source   = "DATA/rsus/WRMC.BSRN/rsus.nc"
weight   = 12

#~~~~~~~~~~~~~~~~~~~~~~~~~~~~~~~~~~~~~~~~~~~~~~~~~~~~~~~~~~~~~~~~~~~~~~~~~~

[h2: Surface Net SW Radiation]
variable = "rsns"
derived  = "rsds-rsus"
weight   = 1

[CERESed4.1]
source   = "DATA/rsns/CERESed4.1/rsns.nc"
weight   = 15

[FLUXNET2015]
source   = "DATA/rsns/FLUXNET2015/rsns.nc"
weight   = 12

[GEWEX.SRB]
source   = "DATA/rsns/GEWEX.SRB/rsns_0.5x0.5.nc"
weight   = 15

[WRMC.BSRN]
source   = "DATA/rsns/WRMC.BSRN/rsns.nc"
weight   = 12

#~~~~~~~~~~~~~~~~~~~~~~~~~~~~~~~~~~~~~~~~~~~~~~~~~~~~~~~~~~~~~~~~~~~~~~~~~~

[h2: Surface Upward LW Radiation]
variable = "rlus"
weight   = 1

[FLUXNET2015]
source   = "DATA/rlus/FLUXNET2015/rlus.nc"
weight   = 12

[GEWEX.SRB]
source   = "DATA/rlus/GEWEX.SRB/rlus_0.5x0.5.nc"
weight   = 15

[WRMC.BSRN]
source   = "DATA/rlus/WRMC.BSRN/rlus.nc"
weight   = 12

#~~~~~~~~~~~~~~~~~~~~~~~~~~~~~~~~~~~~~~~~~~~~~~~~~~~~~~~~~~~~~~~~~~~~~~~~~~

[h2: Surface Net LW Radiation]
variable = "rlns"
derived  = "rlds-rlus"
weight   = 1

[CERESed4.1]
source   = "DATA/rlns/CERESed4.1/rlns.nc"
weight   = 15

[FLUXNET2015]
source   = "DATA/rlns/FLUXNET2015/rlns.nc"
weight   = 12

[GEWEX.SRB]
source   = "DATA/rlns/GEWEX.SRB/rlns_0.5x0.5.nc"
weight   = 15

[WRMC.BSRN]
source   = "DATA/rlns/WRMC.BSRN/rlns.nc"
weight   = 12

#~~~~~~~~~~~~~~~~~~~~~~~~~~~~~~~~~~~~~~~~~~~~~~~~~~~~~~~~~~~~~~~~~~~~~~~~~~

[h2: Surface Net Radiation]
variable = "rns"
derived  = "rlds-rlus+rsds-rsus"
weight = 2

[CERESed4.1]
source   = "DATA/rns/CERESed4.1/rns.nc"
weight   = 15

[FLUXNET2015]
source   = "DATA/rns/FLUXNET2015/rns.nc"
weight   = 12

[GEWEX.SRB]
source   = "DATA/rns/GEWEX.SRB/rns_0.5x0.5.nc"
weight   = 15

[WRMC.BSRN]
source   = "DATA/rns/WRMC.BSRN/rns.nc"
weight   = 12

###########################################################################

[h1: Forcings]
bgcolor = "#EDEDED"

#~~~~~~~~~~~~~~~~~~~~~~~~~~~~~~~~~~~~~~~~~~~~~~~~~~~~~~~~~~~~~~~~~~~~~~~~~~

[h2: Surface Air Temperature]
variable = "tas"
weight   = 2

[FLUXNET2015]
source   = "DATA/tas/FLUXNET2015/tas.nc"
weight   = 9

#~~~~~~~~~~~~~~~~~~~~~~~~~~~~~~~~~~~~~~~~~~~~~~~~~~~~~~~~~~~~~~~~~~~~~~~~~~

[h2: Diurnal Temperature Range]
variable = "dtr"
weight   = 2
derived  = "tasmax-tasmin"

[CRU4.02]
source   = "DATA/dtr/CRU4.02/dtr.nc"
weight   = 25

#~~~~~~~~~~~~~~~~~~~~~~~~~~~~~~~~~~~~~~~~~~~~~~~~~~~~~~~~~~~~~~~~~~~~~~~~~~

[h2: Precipitation]
variable       = "pr"
cmap           = "Blues"
weight         = 2
mass_weighting = True

[FLUXNET2015]
source     = "DATA/pr/FLUXNET2015/pr.nc"
land       = True
weight     = 9
table_unit = "mm d-1"
plot_unit  = "mm d-1"

[GPCCv2018]
source     = "DATA/pr/GPCCv2018/pr.nc"
land       = True
weight     = 20
table_unit = "mm d-1"
plot_unit  = "mm d-1"
space_mean = True

[GPCPv2.3]
source     = "DATA/pr/GPCPv2.3/pr.nc"
land       = True
weight     = 20
table_unit = "mm d-1"
plot_unit  = "mm d-1"
space_mean = True

#~~~~~~~~~~~~~~~~~~~~~~~~~~~~~~~~~~~~~~~~~~~~~~~~~~~~~~~~~~~~~~~~~~~~~~~~~~

[h2: Surface Relative Humidity]
variable       = "rhums"
alternate_vars = "hurs"
cmap           = "Blues"
weight         = 3
mass_weighting = True

[CRU4.02]
source     = "DATA/rhums/CRU4.02/rhums.nc"
weight     = 10

#~~~~~~~~~~~~~~~~~~~~~~~~~~~~~~~~~~~~~~~~~~~~~~~~~~~~~~~~~~~~~~~~~~~~~~~~~~

[h2: Surface Downward SW Radiation]
variable = "rsds"
weight   = 2

[FLUXNET2015]
source   = "DATA/rsds/FLUXNET2015/rsds.nc"
weight   = 12

[GEWEX.SRB]
source   = "DATA/rsds/GEWEX.SRB/rsds_0.5x0.5.nc"
weight   = 15

[WRMC.BSRN]
source   = "DATA/rsds/WRMC.BSRN/rsds.nc"
weight   = 12

#~~~~~~~~~~~~~~~~~~~~~~~~~~~~~~~~~~~~~~~~~~~~~~~~~~~~~~~~~~~~~~~~~~~~~~~~~~

[h2: Surface Downward LW Radiation]
variable = "rlds"
weight   = 1

[FLUXNET2015]
source   = "DATA/rlds/FLUXNET2015/rlds.nc"
weight   = 12

[GEWEX.SRB]
source   = "DATA/rlds/GEWEX.SRB/rlds_0.5x0.5.nc"
weight   = 15

[WRMC.BSRN]
source   = "DATA/rlds/WRMC.BSRN/rlds.nc"
weight   = 12
Running the ILAMB
Now that we have the configuration file set up, you can run the study using the ilamb-run script via the aforementioned
ilamb-run --config config.cfg --model_setup model_setup.txt --regions global
Taking advantage of multiprocessors
Because of the computational costs, you need to run ILAMB through a Portable Batch System (PBS) job on Gadi.
The following default PBS file, let’s call it ilamb_test.job, can help you to setup your own, while making sure to use the correct project (#PBS -P) to charge your computing cost to:
 #!/bin/bash

 #PBS -N ilamb_test
 #PBS -l wd
 #PBS -P your_compute_project_here
 #PBS -q normalbw
 #PBS -l walltime=0:20:00
 #PBS -l ncpus=14
 #PBS -l mem=63GB
 #PBS -l jobfs=10GB
 #PBS -l storage=gdata/ct11+gdata/hh5+gdata/xp65+gdata/fs38+gdata/oi10+gdata/zv30

 # ILAMB is provided through projects xp65. We will use the latter here
 module use /g/data/xp65/public/modules
 module load conda/access-med

 # Define the ILAMB Path, expecting it to be where you start this job from
 export ILAMB_ROOT=./
 export CARTOPY_DATA_DIR=/g/data/xp65/public/apps/cartopy-data

 # Run ILAMB in parallel with the config.cfg configure file for the models defined in model_setup.txt
 mpiexec -n 10 ilamb-run --config config.cfg --model_setup model_setup.txt --regions global
You should adjust this file to your own specifications (including the storage access to your models). Save the file in the $ILAMB_ROOT and submit its job to the queue from there via
qsub ilamb_test.job
Running this job will create a _build directory with the comparison results within $ILAMB_ROOT. You can adjust the place of this directory via a agrument --build_dir argument for ilamb-run.
View Result
Once you finish your ILAMB run, you will get your ILAMB result. The default path to the result is ./_built,unless you specified --build_dir before you run your experiment with ILAMB.
Use VSCode to Simplily Visualise
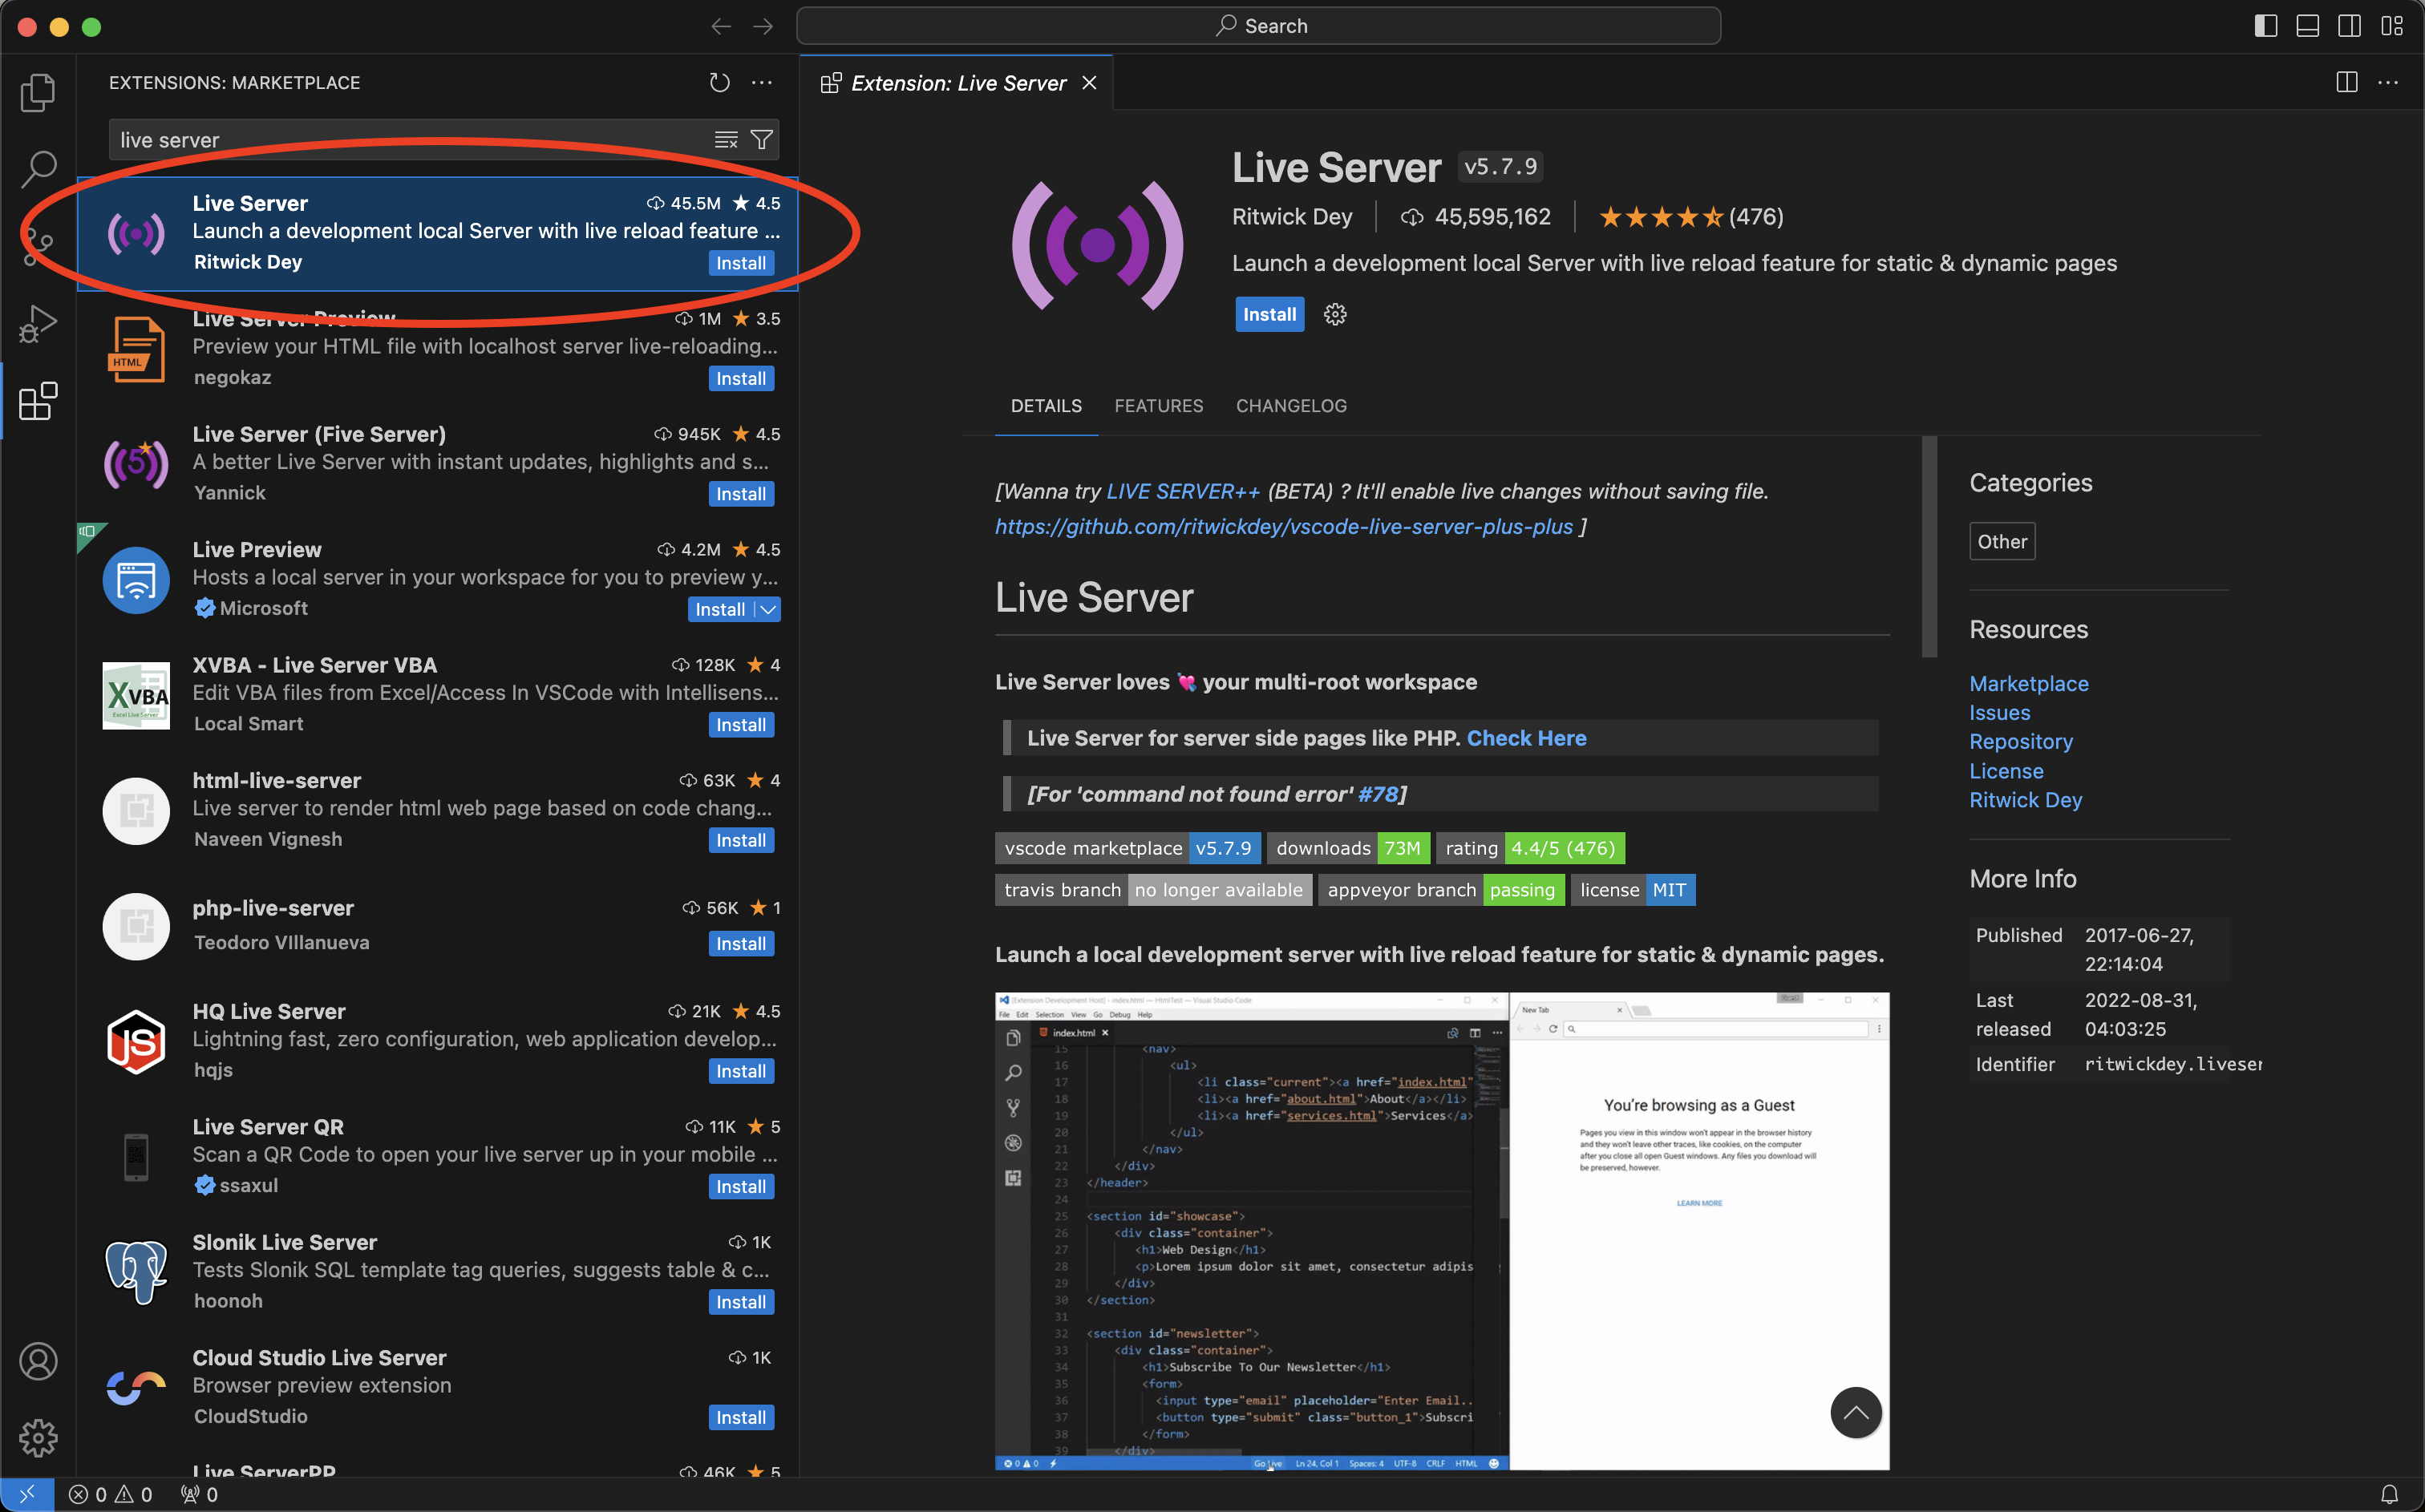
This is the recommended way to visualise result, you need to install extension Live Server in your VSCode, Type live server into the extensions search bar and select the Live Server extension published by Ritwick Dey marked with the red ellipse below. This extension allows us to preview html files from a browser on our computer, and will update automatically as the html file is updated in VS Code. We will use this extension to preview some of the ESMValTool recipe outputs that come in html format. Click install to add the extension.
Once you installed the extension, go to your result directory and right click index.html, choose Open with Live Server, then you will have your result opened in your browser.
In case you don’t use VSCode or Live Server doesn’t work for you, this is another way to view the result. You change your directory to the result directory, create a new local host by below command:
python3 -m http.server
Your ILAMB result can be viewed in the following address: localhost address:
http://0.0.0.0:8000/
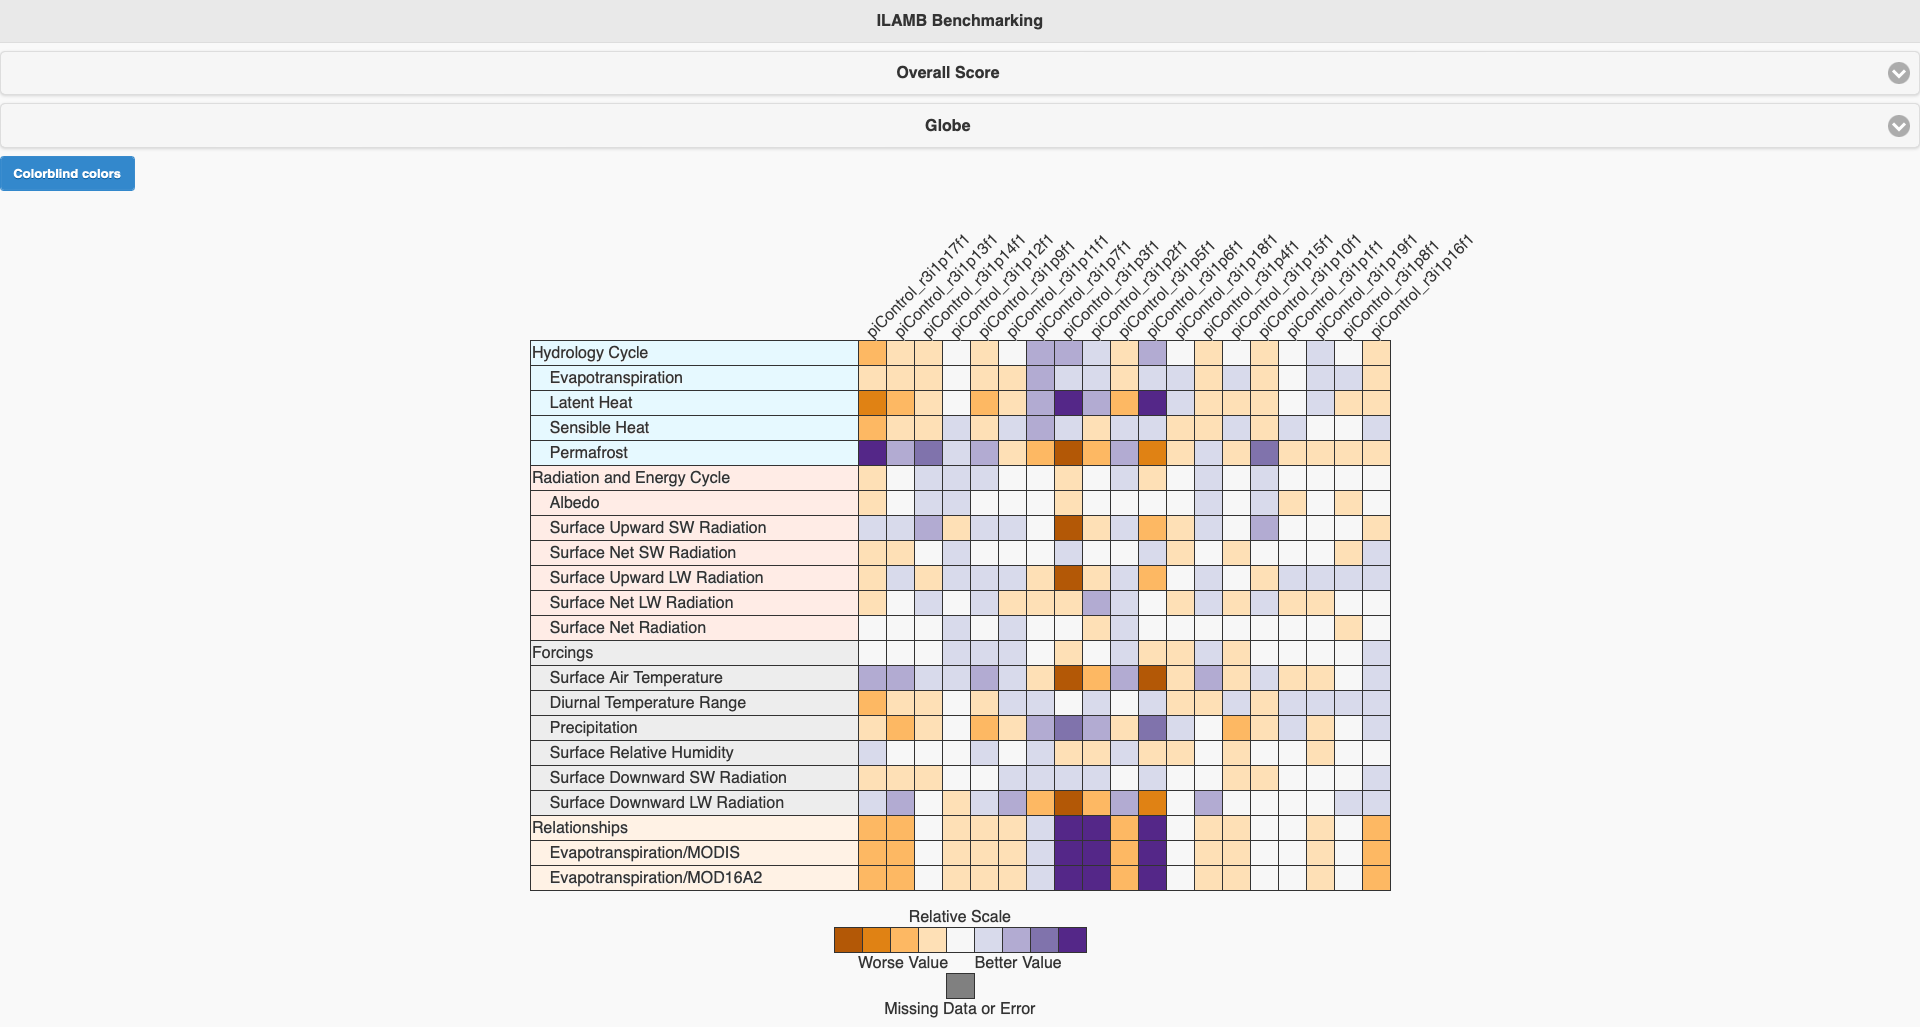
This is an example that we compared different ensemble members in piControl use the config.cfg we showed above. Click each raw, you can see the detail of conparison result with each observational data.
Click each raw of this matrix, you can view all the graphs of comparison results of this specific dataset.

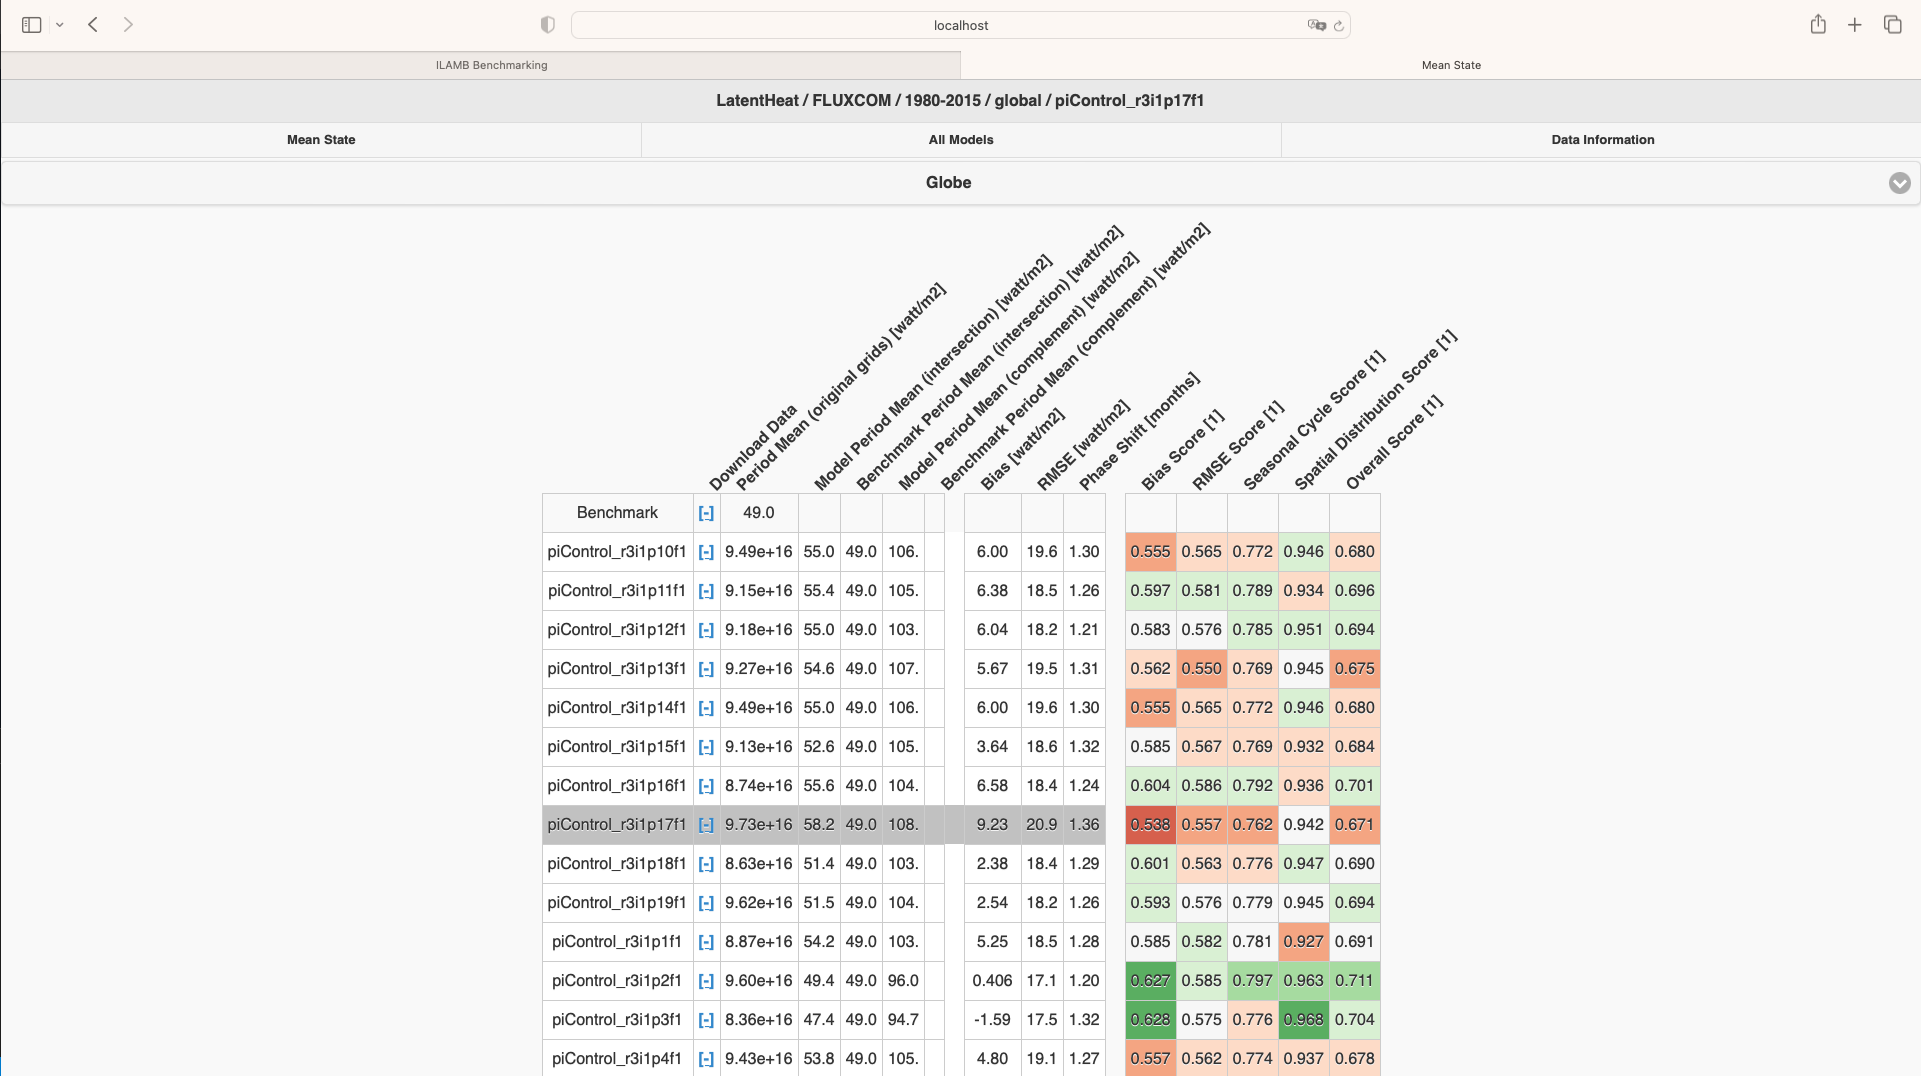
And also if you would like to view all graphs of one specific comparasion, you can click All Models, and choose which comparison you would liek to see(use Temporally integrated period mean rmse score as example), then you will get then all togather.

Key Points
The ACCESS-NRI ILAMB-Workflow facilitates the configuration of the ILAMB on NCI Gadi.
Users need to set up a run using a configuration file.
The
ilamb-tree-generatorallows to quickly build a data directory srtucture for the ILAMB.The ILAMB can take advantage of the multiple CPUs available on Gadi.