Use a Jupyter Notebook to run a recipe
Overview
Teaching: 10 min
Exercises: 20 min
Compatibility: ESMValTool v2.11.0Questions
How to load the
esmvaltoolmodule in ARE?How to view and run a recipe in a Jupyter Notebook?
How to run a single diagnostic or preprocessor task?
Objectives
Learn about the esmvalcore experimental API
View the Recipe output in a Jupyter Notebook
This episode shows us how we can use ESMValTool in a Jupyter notebook. We are using material from a short tutorial from EGU22 and the documentation which is a good place for further reference.
Start a session in ARE
Log in to ARE with your NCI account to start a JupyterLab session.
Refer to this ARE setup guide for more details.
Open the folder to your hackathon folder in nf33 where you can create a new notebook or use the
Intro_to_ESMValTool.ipynb notebook in CMIP7-Hackathon\exercises\Exercise4_files.
Let’s start by importing the tool and some other tools we can use later. Note that we are importing from esmvalcore and calling
it esmvaltool.
# Import the tool
import esmvalcore.experimental as esmvaltool

# Import tools for plotting
import matplotlib.pyplot as plt
import iris.quickplot
Finding a recipe
There is a utils
submodule we can use to find and get recipes. Call the get_all_recipes() function to get a
list of all available recipes from which you can use the find() method to return any matches. If you already know the
recipe you want you can use the get_recipe() function.
In Jupyter Notebook
all_recipes = esmvaltool.get_all_recipes()
# all_recipes
all_recipes.find('python')
Get a recipe
Let’s use the
examples/recipe_python.ymlfor this exercise, the documentation for it can be found here. Then see what’s in the recipe metadata.Solution
example_recipe = esmvaltool.get_recipe("examples/recipe_python.yml")
example_recipe
For reading the recipe:
print(example_recipe.path.read_text())The
example_recipehere is a Recipe class with attributesdataandname, see the reference.example_recipe.name # 'Recipe python'
Pro tip: remember the command line?
This is similar to this function in the command line whihc copies the recipe to your directory.
>esmvaltool recipes get $recipeFile
Configuration in the notebook
We can look at the default user configuration file, ~/.esmvaltool/config-user.yml
by calling a CFG object as a dictionary. This gives us the ability to edit the settings.
The tool can automatically download the climate data files required to run a recipe for you.
You can check your download directory and output directory where your recipe runs will be saved.
This CFG object is from the config module in the ESMValCore API, for more details see here.
Call the
CFGobject and inspect the values.Solution
# call CFG object like this
esmvaltool.CFG
Check output directory and change
Solution
Check this location is your
\scratch\nf33\$USERNAME\esmvaltool_outputs\print(CFG['output_dir']) # edit dir esmvaltool.CFG['output_dir'] = '/scratch/nf33/$USERNAME/esmvaltool_outputs'
Pro tip: Missing config file or load different config
Get configuration file
Rememeber that this command line copies and creates the default user configuration file in your home
.esmvaltoolfolder:esmvaltool config get-config-userLoad a different configuration file to use
# an example path to other configuration file
esmvaltool.CFG.load_from_file('/home/189/fc6164/esmValTool/config-fc-copy.yml')
Running the recipe
Run the recipe and inspect the output.
Run
output = example_recipe.run()
output
This may take some time and you will see some logging messages as it runs
Inspect output
map/script1:
  ImageFile('CMIP5_bcc-csm1-1_Amon_historical_r1i1p1_tas_2000-P1M.png')
  ImageFile('CMIP6_BCC-ESM1_Amon_historical_r1i1p1f1_tas_gn_2000-P1M.png')
  DataFile('CMIP5_bcc-csm1-1_Amon_historical_r1i1p1_tas_2000-P1M.nc')
  DataFile('CMIP6_BCC-ESM1_Amon_historical_r1i1p1f1_tas_gn_2000-P1M.nc')

timeseries/script1:
  ImageFile('tas_amsterdam_CMIP5_bcc-csm1-1_Amon_historical_r1i1p1_tas_1850-2000.png')
  ImageFile('tas_amsterdam_CMIP6_BCC-ESM1_Amon_historical_r1i1p1f1_tas_gn_1850-2000.png')
  ImageFile('tas_amsterdam_MultiModelMean_historical_Amon_tas_1850-2000.png')
  ImageFile('tas_global_CMIP5_bcc-csm1-1_Amon_historical_r1i1p1_tas_1850-2000.png')
  ImageFile('tas_global_CMIP6_BCC-ESM1_Amon_historical_r1i1p1f1_tas_gn_1850-2000.png')
  DataFile('tas_amsterdam_CMIP5_bcc-csm1-1_Amon_historical_r1i1p1_tas_1850-2000.nc')
  DataFile('tas_amsterdam_CMIP6_BCC-ESM1_Amon_historical_r1i1p1f1_tas_gn_1850-2000.nc')
  DataFile('tas_amsterdam_MultiModelMean_historical_Amon_tas_1850-2000.nc')
  DataFile('tas_global_CMIP5_bcc-csm1-1_Amon_historical_r1i1p1_tas_1850-2000.nc')
  DataFile('tas_global_CMIP6_BCC-ESM1_Amon_historical_r1i1p1f1_tas_gn_1850-2000.nc')
Pro tip: run a single Diagnostic
To run a single diagnostic, the name of the task can be passed as an argument to
run()output_1 = example_recipe.run('map/script1') output_1
Recipe output
The output can return the files as well as the image files and data files, also see the reference page.
Let’s look through this recipe output.
- Get the file paths.
- Look at one of the plots.
- Access and inspect the data used for the plots.
Solution
Print the file paths.
for result in output['map/script1']:
    print(result.path)
Look at a plot from the list of plots.
plots = [f for f in output['timeseries/script1'] if isinstance(f, esmvaltool.recipe_output.ImageFile)]
plots[-1]
Load one of the preprocessed data files.
data_files = [f for f in output['map/script1'] if isinstance(f, esmvaltool.recipe_output.DataFile)]

cube = data_files[0].load_iris()[0]
cube
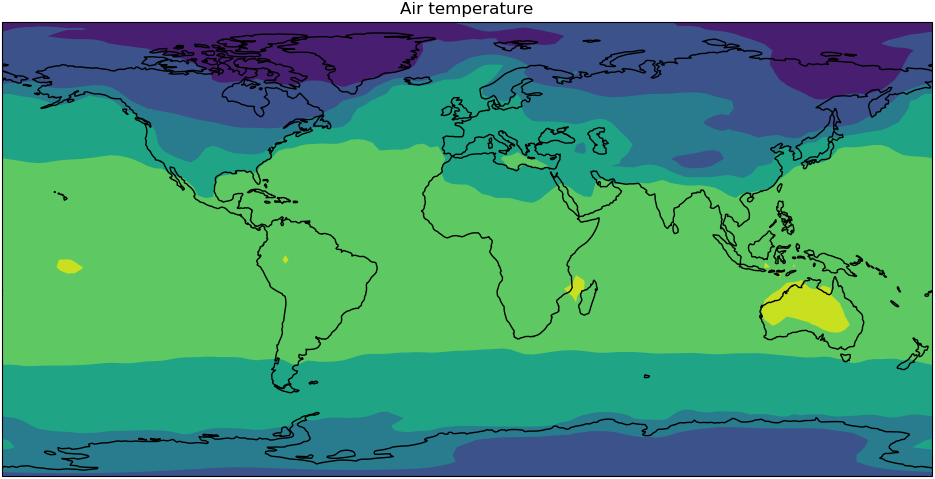
Use the loaded data to make your own plot in your notebook.
Solution
# Create plot
iris.quickplot.contourf(cube)

# Set the size of the figure
plt.gcf().set_size_inches(12, 10)

# Draw coastlines
plt.gca().coastlines()

# Show the resulting figure
plt.show()
Key Points
ESMValTool can be run in a Jupyter Notebook
Access ImageFiles and DataFiles from the recipe run